Happy Tuesday sweet blog friends!

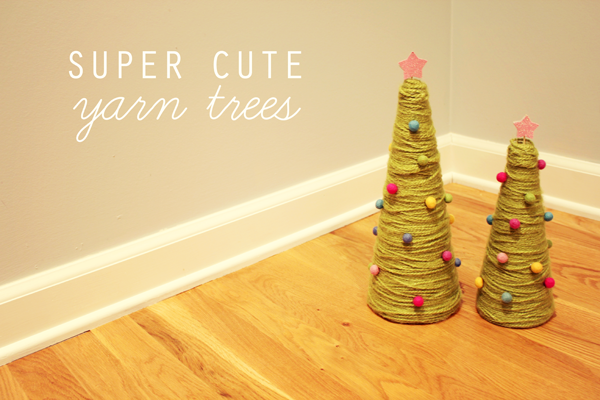
A couple of years ago I created these really cute yarn tress for Christmas and I thought I would repost them in case you were looking for a really cute and simple Christmas craft to do sometime soon! :)
Here’s what you need to make them:
- styrofoam trees (found at your local craft store)
- yarn (I used some really fuzzy yarn for an even more whimsical feel)
- hot glue gun (be careful not to burn yourself though! Maybe a low heat glue gun would be good! I should invest in that! Ha!)
- felt
- toothpicks
- glue dots
- star punch or star die cuts
- felt balls
Here’s what you do:
- Start by tracing the bottom of each tree on your felt. I used some dark brown felt, but you can use any color since you won’t really see this felt – it’ll just cover up the styrofoam on the bottom protecting any surface that you place it on. Once you have the circles cut for the bottoms – hot glue them on each tree.
- Next get your yarn ready – put a bead of hot glue along the very bottom of the tree base and then place your first row of yarn on it. Be careful not to burn your fingers! ;) You can do a little at a time to be sure you don’t. ;)
- Go around the bottom with the yarn and then once you have that first row secure, continue wrapping and wrapping the yarn all the way up the tree. You don’t even have to wrap it perfectly – I had my yarn overlapping, etc., and it turned out cute and whimsical. This craft isn’t suppose to be difficult and stress you out – only fun with cute results! ;) Those are the rules!
- Once you get to the top, clip off the yarn right before the very tip of the styrofoam tree, unless your tree has a pointy top. If it does – just continue wrapping it and clip it off and secure it down with glue. If your tree is like mine and has more of a flat top – what I did was cut off the yarn once I got to the top and then put some glue on the top of the tree and then starting in the center, I started with the yarn and then wrapped it in a circular pattern until the top styrofoam was covered. I hope that makes sense! Ha!
- Then for a cute touch, I added some felt balls that I had to the tree for little ornaments. You could very easily just leave these trees bare for a simple look – I wanted a bit more whimsy so I put the felt balls on the tree. You can be creative and use other things too like pom pom balls, jingle bells, buttons, etc. The ideas are endless! Seriously!
- Lastly, I punched out two star for each tree using a star punch and some pink glittered American Crafts cardstock and then I put a super strong glue dot on one stars and placed the toothpick on top of that glue dot and then added another glue dot on top of the toothpick and then added the other star on top of it.
- The just stick that toothpick start into the styrofoam at the top of your tree.
And there you go – super cute Christmas yarn trees. :)
Happy Crafting! :)

CraftCrave | Blog | Scrapbooking Tutorials (large): Sunday, 09 Dec 2012
December 8, 2012 at 2:17 pm[…] How To: Yarn Trees – 1 freebie(s)? […]
Kerry
December 9, 2012 at 8:46 pmhi Kristina! I just love all of your work and have had my eye on these trees since I saw your post last year about them…anyway, I finally got around to making them this year. I was just about to blog about them and then I saw this post on your blog, ha!!
Anyway, I went ahead & tried my own version. I posted them on the blog tonight. Thanks for the inspiration!
http://www.kerryspapercrafts.com/?p=4829
Kristina
December 10, 2012 at 9:22 amHi Kerry!
Thank you SO much for the sweet words! LOVE your version! Super cute!! Hugs!
Lindsey
December 9, 2012 at 10:11 pmThese are really adorable! I love the felted balls. :) Your blog design is also very cute by the way… And wonderful photography!!!
Kristina
December 10, 2012 at 9:22 amThank you so much, Lindsey! Hugs!!!